
Template Fonts is reader supported. When you buy through links on our site, we may earn an affiliate commission. Learn more
Canva is a popular graphic design platform that offers numerous features to create stunning designs for various purposes. One such feature is the ability to edit and trim videos. However, sometimes you may want to delete a specific frame from your video to make it more polished and professional. In this article, we will explain how to delete video frames in Canva.
Deleting a video frame in Canva is a simple process that can be completed in just a few steps. First, open your video in the Canva editor and click on the “Trim” button. This will open the video timeline, where you can see all the frames in your video. To delete a frame, simply click on it and press the “Delete” key on your keyboard. You can also use the “Split” tool to separate the frame you want to delete from the rest of the video and then delete it.
By deleting unwanted frames from your video, you can make it more engaging and professional. Whether you are creating a marketing video or a tutorial, removing unnecessary frames can help you to convey your message more effectively. With Canva’s easy-to-use video editing tools, you can delete frames and create stunning videos in no time.
Understanding Canva’s Interface
Canva is a user-friendly online graphic design platform that offers a wide range of design templates, including video templates. To delete a video frame in Canva, it is essential to understand the platform’s interface. This section will provide a brief overview of Canva’s interface to help you navigate the platform effectively.
Navigating the Dashboard
When you log in to Canva, you will be directed to the dashboard, where you can access all of your designs. The dashboard is divided into two sections: “All your designs” and “Shared with you.” The “All your designs” section displays all of your designs, including videos. You can locate the video you want to delete by scrolling through the list or using the search bar.
Locating the Video Editor
Once you have located the video you want to delete, you can proceed to delete it. To do this, you need to access the video editor. To access the video editor, click on the video you want to delete. This will open the video editor, where you can trim, delete, or edit the video.
In the video editor, you will see a timeline that displays the video frames. To delete a video frame in Canva, you need to select the frame you want to delete and click on the delete button. Alternatively, you can use the trim handles to shorten or lengthen the scene. If you want to delete the entire video, you can click on the delete button located at the bottom of the editor.
In conclusion, understanding Canva’s interface is crucial to deleting a video frame in Canva. By navigating the dashboard and accessing the video editor, you can delete the video frame or the entire video.
Selecting Your Video
To delete a frame from your video in Canva, you first need to select the specific video you want to edit. To do this, follow these steps:
- Log in to your Canva account and click on “All your designs” on the homepage.
- Find the video you want to edit and click on it to open it in the editor.
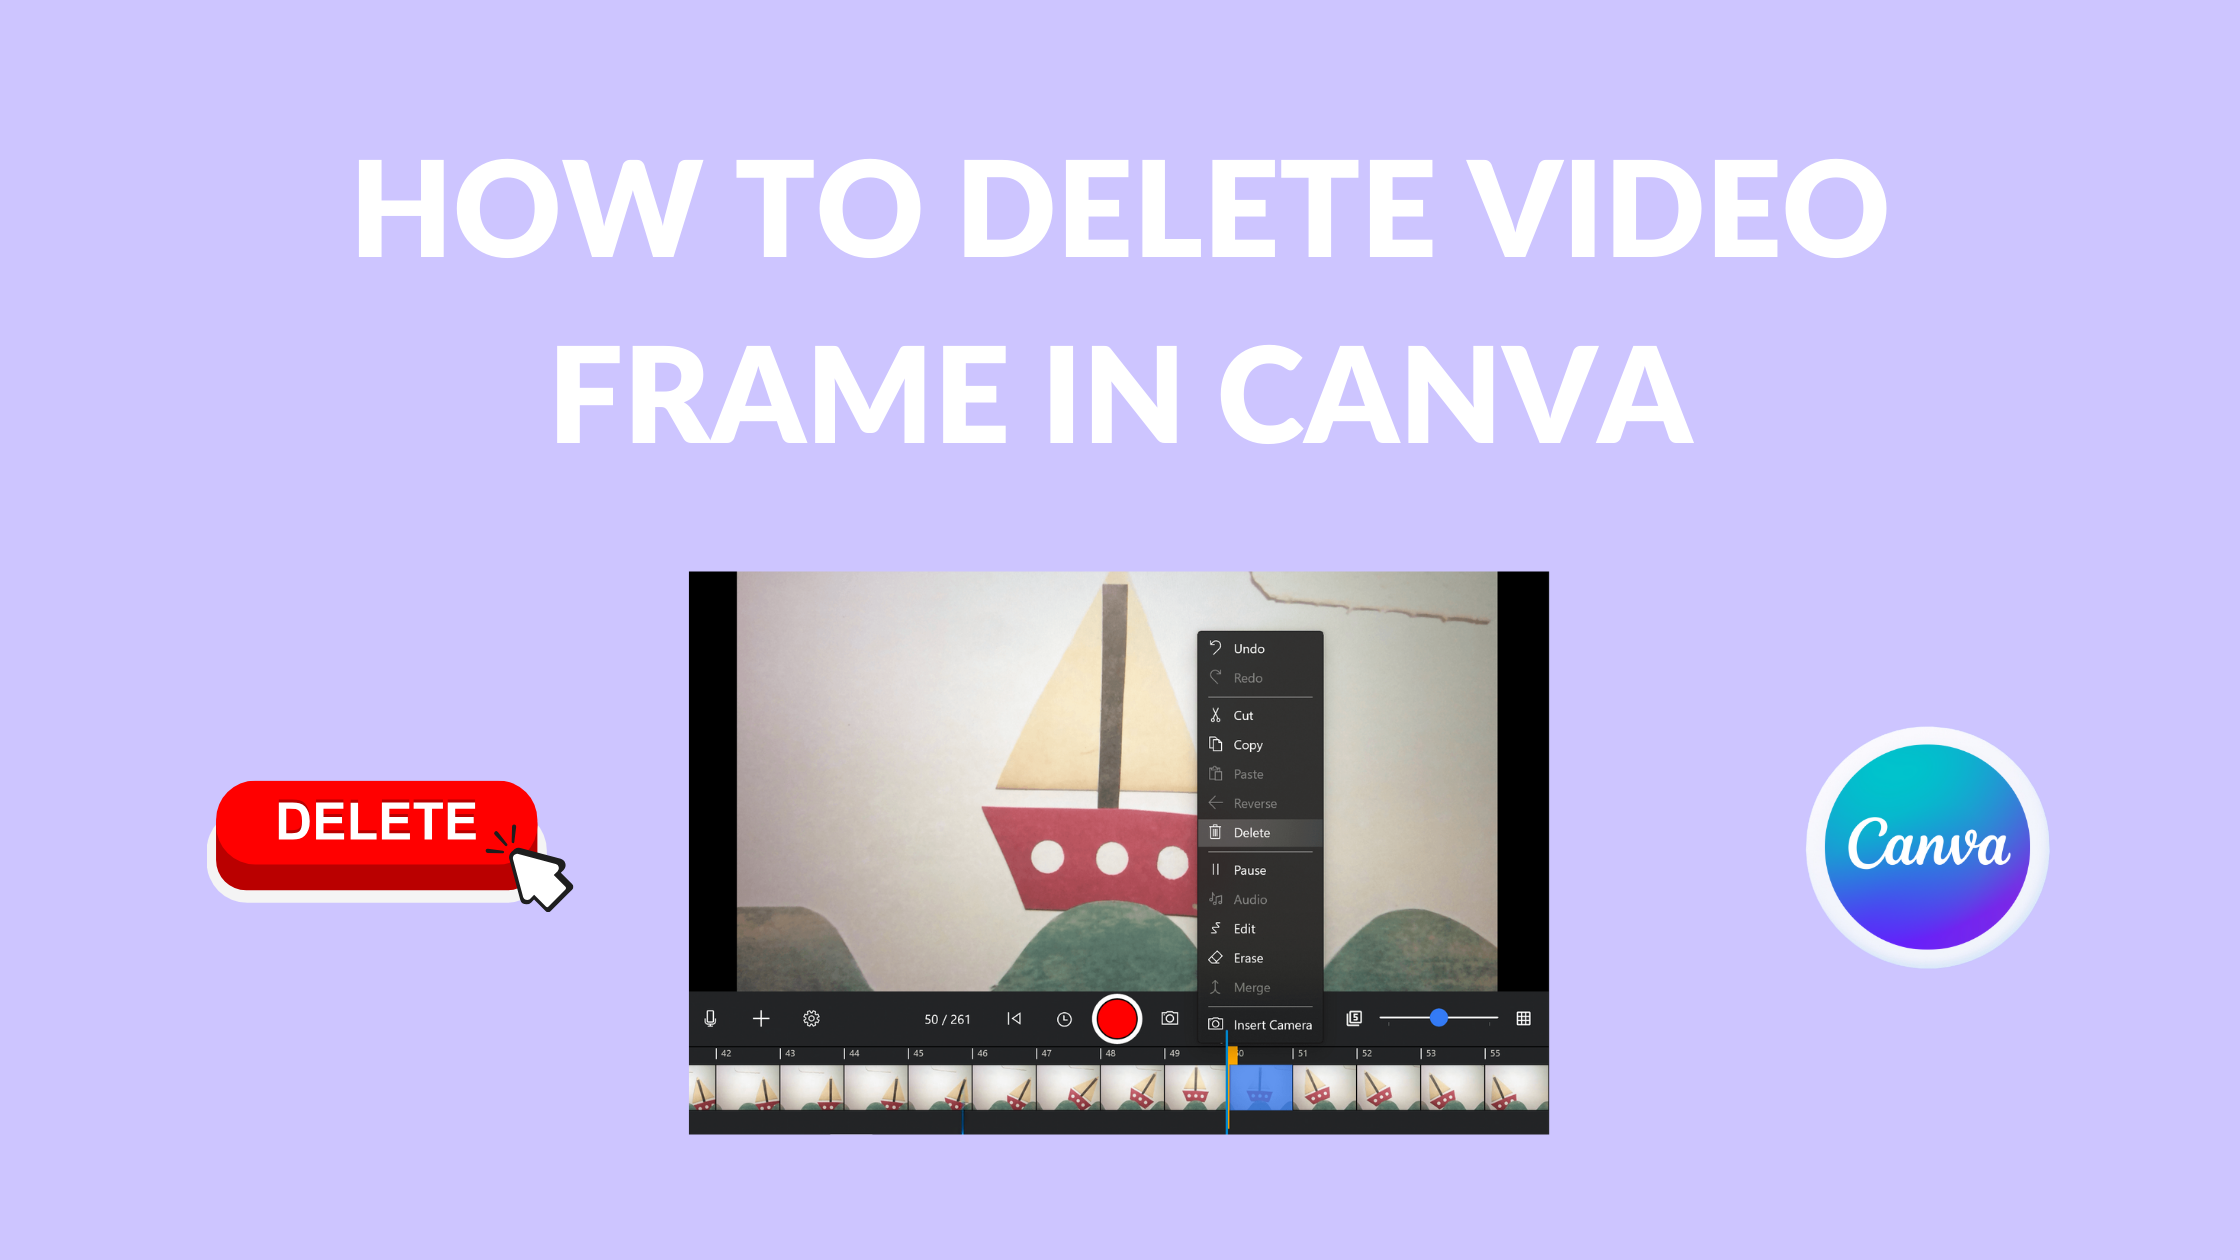
- On the timeline at the bottom of the editor, locate the frame you want to delete. The timeline displays all the frames in your video in chronological order.
- Click on the frame to select it. The selected frame will be highlighted in blue.
Once you have selected the frame you want to delete, you can proceed to delete it.
Accessing the Video Editor
Opening the Editor
To delete a video frame in Canva, users must first open the video editor. To do this, they can follow these steps:
- Log in to their Canva account.
- Click on “Create a design” on the homepage.
- Select “Video” from the list of design types.
- Choose a video template or start from scratch.
Once the user has opened the video editor, they can begin the process of deleting a video frame.
Video Tools
Canva’s video editor provides users with a variety of tools to edit their videos. These tools include:
- Trimming: Users can trim the length of their video by removing frames from the beginning or end.
- Splitting: Users can split their video into two or more segments, allowing them to edit each segment separately.
- Adding text: Users can add text overlays to their video.
- Adding music: Users can add background music to their video.
- Adjusting speed: Users can speed up or slow down their video.
To delete a video frame in Canva, users can use the trimming tool to remove the frame from their video. They can also split the video into two segments, delete the segment containing the unwanted frame, and then merge the remaining segments back together.
Overall, Canva’s video editor provides users with a user-friendly interface and a variety of tools to edit their videos. With a few simple clicks, users can delete unwanted frames and create professional-looking videos.
Identifying Frames
Frames are containers in Canva where users can add images or videos to their designs. They are represented by a rectangular or circular shape with a dotted line around them. Frames can be found in Canva templates or added to a design manually.
To identify frames in a Canva design, users can look for the dotted line around a shape. Frames can also be recognized by the “Frame” label that appears when the user hovers over the container. Additionally, users can click on the frame to see the options available for that specific container.
Frames are essential for adding images or videos to Canva designs. They provide a designated space for users to add their media content. Frames can be resized, rotated, and moved around the design to fit the user’s needs.
In summary, identifying frames in Canva is easy. Users can look for the dotted line around a container or hover over the container to see the “Frame” label. Frames are essential for adding media content to Canva designs, and they can be resized, rotated, and moved around the design.
How to Delete a Frame
Selecting the Frame
To delete a frame in Canva, the user must first select the frame they wish to delete. This can be done by clicking on the frame in the timeline at the bottom of the screen. The selected frame will be highlighted in blue.
Deleting the Frame
Once the user has selected the frame they wish to delete, they can simply press the delete key on their keyboard, or they can right-click on the frame and select “Delete” from the drop-down menu. The frame will be removed from the timeline, and the remaining frames will be shifted to fill the gap.
It is important to note that deleting a frame cannot be undone. If the user accidentally deletes a frame, they will need to manually recreate it.
In summary, deleting a frame in Canva is a quick and easy process. By selecting the frame and pressing the delete key or right-clicking and selecting “Delete,” the user can remove unwanted frames from their video project.
Saving Your Changes
Once you’ve finished editing your video in Canva, it’s important to save your changes to ensure that your hard work isn’t lost. Canva offers several options for saving your edited video.
The first option is to simply click on the “Done” button in the top right corner of the editor. This will save your changes and take you back to the main Canva dashboard. From there, you can download your edited video or share it on social media.
Another option is to click on the “Download” button in the top right corner of the editor. This will allow you to download your edited video in a variety of formats, including MP4, GIF, and MOV. You can also choose the quality of your video download, ranging from low to high.
If you want to come back to your edited video at a later time, you can save it as a draft by clicking on the “Save as Draft” button in the top right corner of the editor. This will save your changes and allow you to come back to your edited video later to continue working on it.
Overall, saving your changes in Canva is a simple and straightforward process. Whether you want to download your edited video or save it as a draft for later, Canva offers several options to ensure that your hard work is never lost.
Troubleshooting Common Issues
Video Not Loading
If a user is having trouble loading a video in Canva, there are a few things they can try to resolve the issue. First, they should check their internet connection to ensure it is stable and strong. Slow or weak internet connections can cause videos to load slowly or not at all.
If the internet connection is not the issue, the user should try clearing their browser’s cache and cookies. This can help to resolve any issues related to the browser’s history or data.
If the issue persists, the user can try uploading the video again or contacting Canva’s customer support team for assistance.
Frame Not Deleting
If a user is having trouble deleting a frame in Canva, there are a few things they can try to resolve the issue. First, they should ensure that they have selected the correct frame and are using the correct tool to delete it.
If the user is still unable to delete the frame, they should try refreshing the page or logging out and logging back in to their account. This can help to resolve any issues related to the website’s functionality or the user’s account.
If the issue persists, the user can try deleting the frame from a different device or browser. They can also contact Canva’s customer support team for assistance if necessary.
Remember to always check the Canva Help Center for more information and troubleshooting tips.
Alternative Methods for Frame Deletion
Deleting a frame from a Canva template can be done in several ways. In addition to the method mentioned earlier, there are other ways to remove frames from a design. Here are some alternative methods for deleting video frames in Canva:
Method 1: Delete the entire page
One way to delete a frame is to delete the entire page. This method is useful when you want to delete all the frames on a page. To delete a page, right-click on the page and select “Delete Page”. This will delete the entire page, including all the frames on that page.
Method 2: Delete the contents of the frame
Another way to delete a frame is to delete the contents of the frame. This method is useful when you want to keep the frame but remove the content inside it. To delete the contents of a frame, click on the frame and select the content inside it. Then, press the delete key on your keyboard to remove the content.
Method 3: Use the trash can
The third method is to use the trash can. This method is useful when you want to delete a frame but still have the option to restore it later. To delete a frame using the trash can, click on the frame and select the “Delete” button. The frame will be moved to the trash can, where it can be restored if needed.
These alternative methods for deleting video frames in Canva can be helpful when you want to delete a frame quickly or keep the frame but remove its contents. Choose the method that works best for your needs and design preferences.
Tips and Tricks for Efficient Frame Deletion
Deleting frames from a video can be a time-consuming process, but there are some tips and tricks that can help make it more efficient. Here are a few suggestions:
-
Use the Canva Video Trimmer tool to easily delete frames. Simply click the video timeline and hover over either of the two ends until a double-headed arrow appears. Drag the edges until you reach the desired length. Alternatively, you may click the video element, then click the Trim tool (scissor icon). Input a specific duration in seconds and click Done.
-
Consider using mpdecimate to remove duplicate frames. This filter can be applied in Canva by using the “Filter” option in the video editor. It will automatically remove any frames that are identical or nearly identical to the previous frame.
-
Another way to speed up the process is to use keyboard shortcuts. Canva provides a list of shortcuts that can be accessed by pressing the “?” key. Some useful shortcuts for video editing include “K” to pause/play, “J” to rewind, and “L” to fast forward.
-
Grouping different elements together can also make it easier to delete frames. This can be done by selecting multiple elements and then right-clicking to access the “Group” option.
-
Finally, it’s important to remember to save your progress frequently while deleting frames. This can prevent any lost work in case of a system crash or other unexpected event.
By following these tips and tricks, deleting frames from a video in Canva can be a more efficient and streamlined process.