Template Fonts is reader supported. When you buy through links on our site, we may earn an affiliate commission. Learn more
If you’re looking to add a little more depth to your Canva designs, creating a gradient background is an easy way to do it. A gradient background is a gradual transition from one color to another, creating a visually appealing effect that can make your designs stand out. Canva offers a variety of tools and options to create gradient backgrounds, and with a little bit of know-how, you can create a professional-looking design that is sure to impress.
How to Create a Custom Gradient Background in Canva
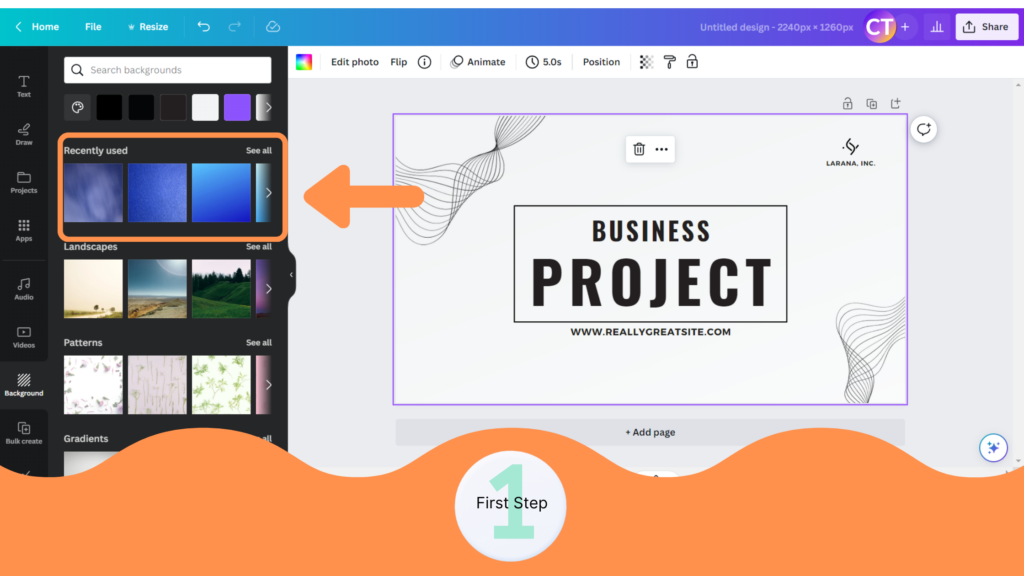
Step 1: Accessing Canva’s Background Feature
Before you can create a gradient background in Canva, you need to access the background feature. Here’s how:
- Open Canva and log in to your account.
- Click on the “Create a design” button to start a new project.
- Select the type of design you want to create, such as a social media post or presentation slide.
- Once you’re in the editor, look for the “Background” button in the left-hand panel. It may be located under the “Elements” tab.
- Click on the “Background” button to access Canva’s background options.
Once you’ve accessed the background feature, you can start creating your gradient background. Keep in mind that Canva offers a variety of options for backgrounds, including solid colors, patterns, and images. You can also upload your own images to use as a background.

Before you start creating your gradient background, it’s a good idea to have a color scheme in mind. Think about the colors you want to use and how you want them to blend together. This will help you create a gradient that looks cohesive and professional.
Step 2: Choosing Gradient Background
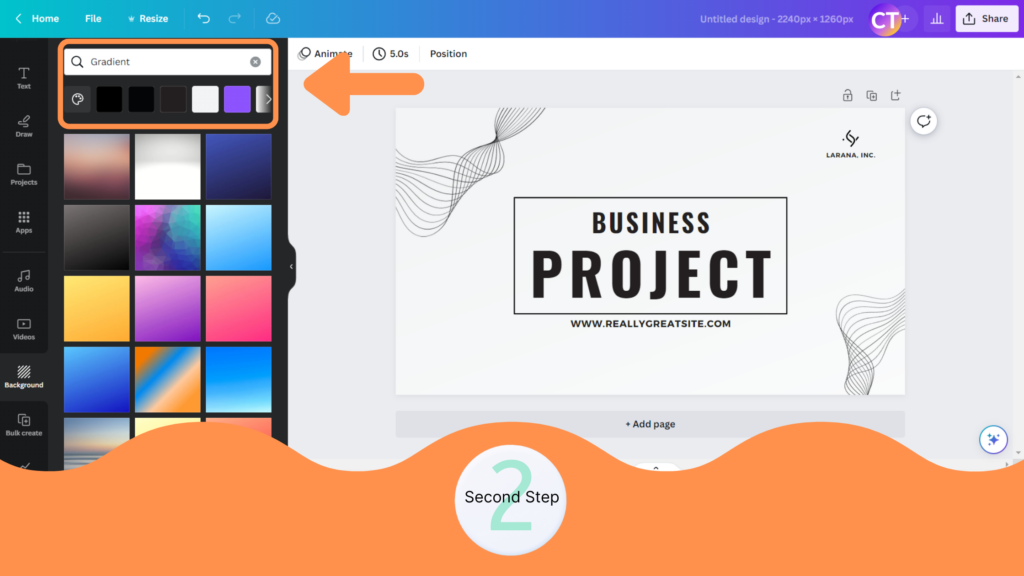
After opening or creating a new project in Canva, the next step is to choose a gradient background. Canva offers a variety of gradient options to choose from, and users can also create their own custom gradients.
To select a gradient background, click on the “Elements” tab located on the left side of the screen. In the search bar, type “gradient” and press enter. Canva will display a variety of gradient options to choose from. Users can scroll through the options and click on the one that best suits their needs.
If none of the pre-made gradients are suitable, users can create their own custom gradient by clicking on the “Background” tab located on the right side of the screen. From there, click on the “Gradient” option and select the colors and direction of the gradient. Users can also adjust the opacity and position of the gradient to achieve the desired effect.

It’s important to choose a gradient background that complements the overall design of the project. Consider the color scheme and the message that the project is trying to convey. A gradient that is too bright or bold may detract from the main message, while a gradient that is too subtle may not be noticeable enough.
Once a gradient background has been chosen, it’s time to move on to the next step in the design process. With Canva’s easy-to-use interface and wide range of design options, creating a professional-looking project has never been easier.
Step 3: Customizing Gradient Colors
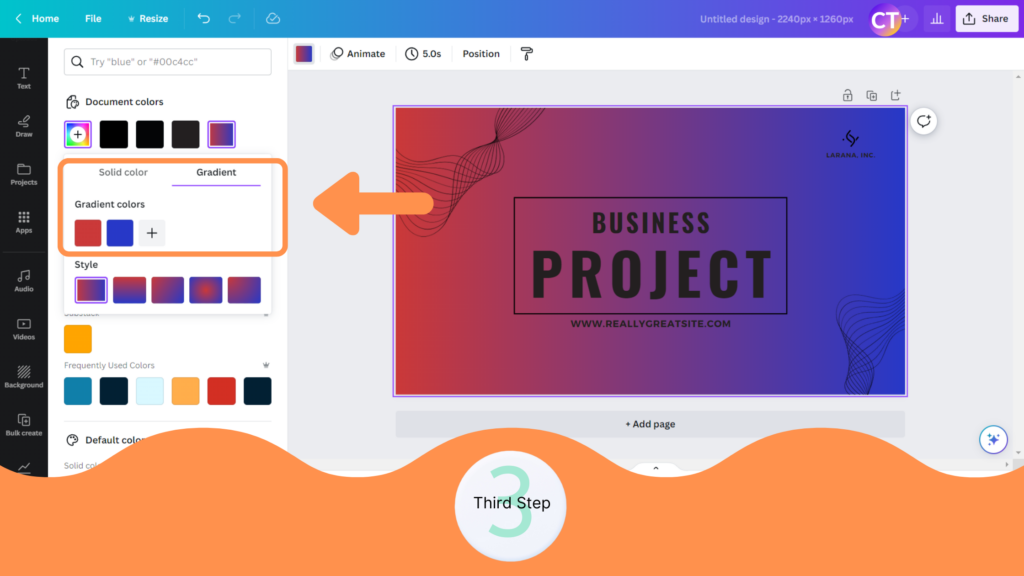
Once you have chosen your gradient, it’s time to customize the colors to fit your brand. Canva offers several options to help you achieve the perfect gradient color scheme for your design.
First, you can adjust the colors of the gradient by clicking on the color stops on the gradient bar. You can change the hue, saturation, and brightness of each color stop to create a custom gradient that matches your brand’s colors. You can also add more color stops to the gradient by clicking on the gradient bar where you want to add a new color stop.

If you want to use a specific color in your gradient, you can enter the hex code or RGB values in the color picker. This is a great option if you have specific brand colors that you want to use in your design.
Another way to customize your gradient is by adjusting the opacity of the colors. You can do this by clicking on the color stop and adjusting the opacity slider. This is a great way to create a more subtle gradient that doesn’t overpower your design.
Finally, you can add additional effects to your gradient, such as a texture or pattern overlay. Canva offers several options to choose from, or you can upload your own texture or pattern to use in your design.
By customizing the colors and effects of your gradient, you can create a unique and professional-looking background for your design.
Step 4: Adjusting Gradient Direction and Intensity
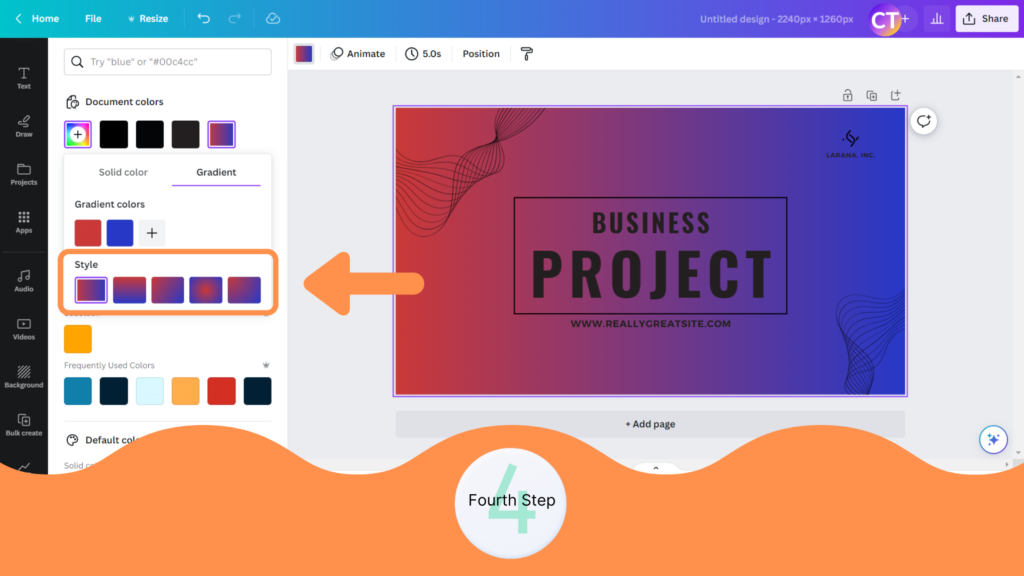
After selecting the colors for your gradient, you can adjust the direction and intensity of the gradient to achieve the desired effect. Here are the steps:
- Select the gradient you want to adjust.
- Click on the “Edit Gradient” button.
- Use the angle slider to adjust the direction of the gradient. You can also use the circular handle on the gradient preview to adjust the angle.
- Use the “Intensity” slider to adjust the strength of the gradient. Moving the slider to the right will make the gradient more intense, while moving it to the left will make it less intense.
- Click “Done” when you are satisfied with the changes.
Adjusting the direction and intensity of the gradient can help you achieve different effects. For example, a gradient with a vertical direction can create a sense of height or depth, while a gradient with a diagonal direction can add movement or energy to your design. Similarly, adjusting the intensity of the gradient can create a subtle or bold effect, depending on your design goals.

Experiment with different directions and intensities to find what works best for your design. Remember to keep it simple and avoid making exaggerated or false claims. A well-executed gradient can add depth and interest to your design without overwhelming it.
Step 5: Adding Additional Elements to the Background
Now that you have created your gradient background in Canva, you can add additional elements to enhance the design. Here are a few tips to get you started:
- Consider adding text or shapes to the background to create a more dynamic design.
- Use the “Elements” tab on the left menu to browse through the different options available.
- Once you find an element you like, simply drag and drop it onto the background.
- Adjust the size and position of the element as needed.
- You can also adjust the transparency of the element to create a more subtle effect.
Remember, less is often more when it comes to design. Try not to overcrowd the background with too many elements. Instead, focus on creating a cohesive design that enhances your content.

With these tips in mind, you can take your gradient background in Canva to the next level and create a design that truly stands out.
Conclusion
Creating a gradient background in Canva is a simple process that can add depth and visual interest to your designs. With the right color choices and positioning, a gradient background can make your design stand out and grab attention.
I hope you found this guide covering how to create a background gradient in Canva, useful! Be sure to check out our blog for more article covering the essential tips, tricks, and advice for Canva! Also, if you haven’t already tried CanvaPro, you can try it for free for 30 days!

